Bit of a dump
Posted: 17 January 2007 Filed under: Sound, Undergrad | Tags: sound, Undergrad Leave a commentThis might not make sense to anyone else but me but here’s some thoughts for the negotiated project.
I was gonna scrap the delayStick and do something completely different but after the encouraging feedback I got, I’m thinking I should stick with it and expand on it. But how….
video feed and some sort of VJ thing
sample/delay streaming audio like internet radio
live audio feed (already done it but maybe add a sampler to it)
Then, do I need to modify or rebuild the stick? For example, if it had a sampler and I want to add multiple layers, does it need a button to stop a recording of one level?
See, told you it wouldn’t make any sense.
The delayStick
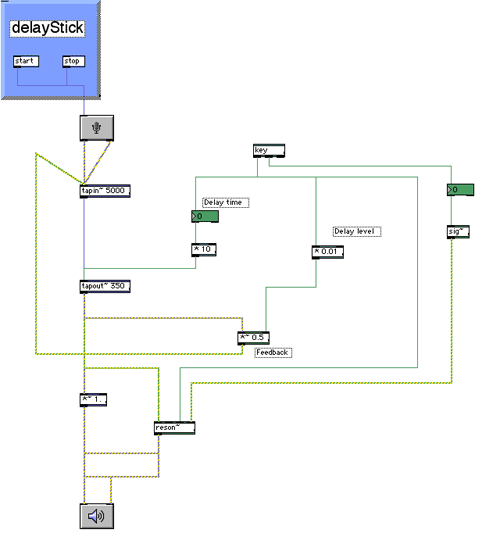
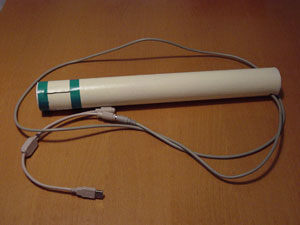
Posted: 11 December 2006 Filed under: Sound, Undergrad | Tags: sound, Undergrad Leave a commentAfter going thru’ tutorials, I realised that I wasn’t really that interested with synthesis sound as created with sine and sawtooth waves but more interested in manipulating existing sound. As in a previous post, I remember seeing a guy visiting iDAT who had this bag of gas that you squeezed to produce sound and he wanted to do the same but use live street sounds which I thought was pretty cool. In the patch I used delays primarily because that was the effect that I understood fairly quickly. The patch might not look particularly sophisticated but by waving and twisting the stick, you get some interesting effects.
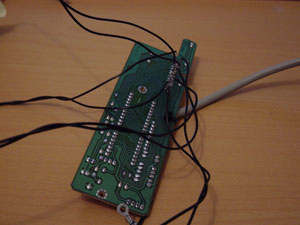
The delayStick has 5 tilt switches at one end of a tube arranged at different angles to form an array. Because the tilt switches activate at an angle of 10 degress from rest, by having them like that allows them to activate at different times when the tube is moved around. The tilt switches are connected to a circuit board from an old PS/2 keyboard and generate a keypress when tilted. The ascii value of the keypress is then used to calculate the amount of delay to put onto the audio feed.
Watch Quicktime movie of delayStick in action (3MB)
Constructing the stick 2
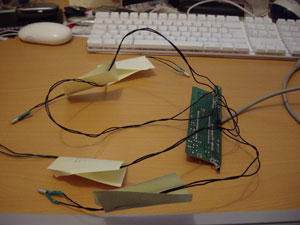
Posted: 10 December 2006 Filed under: Sound, Undergrad | Tags: sound, Undergrad Leave a commentSo after after a bit of a rest to recharge the batteries (that’s the soldering iron, not me!), I connected up the last tilt switch to the keyboard matrix, did a quick test with my patch and I was ready to get it into the pipe. I dropped some string thru the hole and down the pipe, tied it round the end of the PS/2 connector and pulled it up. Unfortunately, the cable wouldn’t bend enough for me to pull it thru the hole and the pipe was too narrow for me to get my hand up to try and force it to bend. I had a cardboard tube which at the time I thought was too short, so I retrieved it from the “stuff to go to the recycle” pile and slapped some paint on. Whilst it was drying, I sprayed the matrix and my soldering with a thin layer of plastic sealant to try and protect it when it would be pulled thru the tube.
After a couple of hours, the paint was dry. I cut 4 slits in one end to hold the card which the array of tilt switches were stuck to and a small chunk at the other for the cable to feed out of. Then I started to feed the cable, followed by the matrix which was then followed by the array into the tube. A couple wires snapped which needed a quick repair with solder and insulating tape but other than that no major casualties. I trimmed the card, put some tape round to help to hold them in place and popped the covers on the ends of the tube. After a quick test it looks as though the delayStick is ready to rock.
Constructing the stick 1
Posted: 9 December 2006 Filed under: Sound, Undergrad | Tags: sound, Undergrad Leave a commentFinally got my soldering iron out and started connecting tilt switches up to the keyboard matrix. Everytime I connected one up, I quickly tested it with my patch and each one generated the values that I expected which was a bit of a relief. As with putting the Simontron together, my soldering iron needed recharging right at the crucial moment which in this case was putting the last tilt switch circuit together. Still, at least it let me start work on the pipe.
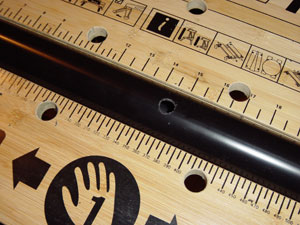
Thanks to the combined efforts of Mr Black and Mr Decker, I managed to drill a hole in the pipe for the cable to feed thru without splitting it. I then cellotaped the tilt switches to some paper to workout the best positions for them. Not a roaring success but then paper isn’t the most inflexible material around. It did give some readings but 2 seemed to dominate the proceedings so a rethink on the order is likely to be needed. It has highlighted a problem that I had first thought about when I came up with concept but had shoved to the back of my mind – how do I fix the array inside the pipe? I’m thinking something along the lines of a couple of small holes, cocktail sticks and some superglue but that’ll have to wait ’til tomorrow. In case you were wondering, the post-its are so I know which switch generates what signal.
That was close
Posted: 5 December 2006 Filed under: Sound, Undergrad | Tags: sound, Undergrad Leave a commentHad a bit of a scarey moment today with getting live audio into a mac. I took my Griffin in, rigged it up with my iPod and knocked up a simple patch just to make sure that it all works. Once I eventually managed to get a mac to “play” via a mixer, I then tried to get the iPod/Griffin combo to work. Nothing. Swapped usbs, played about with settings but still no joy. Got Benji involved and after a good half hour he was no further ahead than me. He said that some people had the same problem last year and overcame it by plugging straight into the input socket on the back of the G5. That’s fine by me, don’t really care just as long as I can get live audio into the mac somehow.
On the subject of live audio, the road outside of Babbage is pretty quiet so I’m wondering if I’ll get any good street sounds when I come to demo it. I might just ask for someone to volunteer to plug their iPod in. I could ask for them to speak into the mic but I don’t think I’ll get many takers 🙂
My patch is pretty much done. Following on from deconstructing other patches and a couple tutorials that came with Max, I’ve gone with the delay and testing with a normal keyboard produced some pretty good effects. Even managed to extend a Killers track by 3 minutes – no most Killers tracks are not 3 minutes longer than they should be either! So anyway, pretty much on course although I’ve still to cut and drill my pipe and solder up my switches.
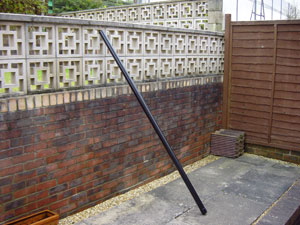
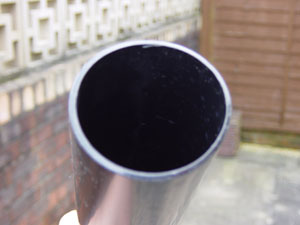
Pipe
Posted: 30 November 2006 Filed under: Sound, Undergrad | Tags: sound, Undergrad 1 CommentI collected my tilt switches earlier today from the Electronics School and have just got back from a tour of the DIY stores looking for a pipe wide enough for my circuit board to fit in. I ended up getting a downpipe normally used with guttering. I got some funny looks from the shop staff in most of them as I tried to squeeze the circuit board into the pipe to see if it would fit. Probably thought I was a terrorist. Time to get the saw out and start hacking it up – just as well they had loads left!!
Sound applet update
Posted: 27 November 2006 Filed under: Sound, Undergrad | Tags: sound, Undergrad Leave a commentBeen a bit quiet reporting on this but that doesn’t mean I haven’t been beavering away in the background. I’ve been working thru’ MSP tutorials and found them a bit heavy going but I’ve found some examples that other people have made and have been de-constructing them and that’s helped a lot. I’ve just ordered a Griffin iMic so that I can rig up a microphone. I’ve been using my windoze laptop coz it’s got a mic socket but with the way it overheats, it might be considered a fire risk if I take it in. A couple of years ago, a German guy (can’t remember his name, maybe Dan does) came in with a gas filled balloon that you squeezed to produce sounds. Not those sort of sounds, electronic sounds I meant. Anyway, he told us at the time that he wanted to record street sounds and with the balloon play them back but obviously distorted. Not sure why, but I’ve always remembered this as quite a cool thing to do and the sound applet might be a good thing to attempt it with.
The electronics side is going ok. I’ve ordered 10 tilt switches after Dan gave me some advice on making an array with them and they should be here in the next couple of days. Biggest problem I’ve got is with the tube. The Pringles empty from our away-day is too wide. I saw something at B&Q the other day but dismissed it as being too narrow but now I think it’ll do the job. Wonder if they do NUS discount?
Electronics lesson
Posted: 16 November 2006 Filed under: Sound, Undergrad | Tags: sound, Undergrad Leave a commentNot so much a lesson more a safety tutorial. Don’t hang your coat on the back of the chair, don’t touch the hot end of the soldering iron, never run with scissors – he didn’t mention that one but it’s still a top tip kids. We also got told about using the lab and how we can order more kit. At the end, we were given our goody bag of resistors, tilt switches and light sensors.
We went and tracked down Dan to have a quick chat about our sound applets. Gareth mentioned to me earlier in the week that he thought I might need an accelerometer coz I was concerned that I wouldn’t be able to measure the tilt of my rainmaker but Dan had a solution using an array of tilt switches which will do the job – it’ll also save me a bit of money as well. He mentioned that we ought to look at Max first rather than get hung up over the front end which makes sense considering my first venture into MSP didn’t work and I couldn’t see why only to find out that it doesn’t like MP3 files – yet another top tip for you.
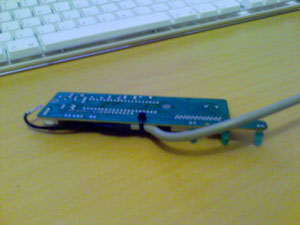
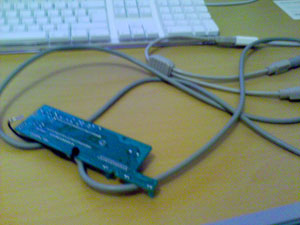
Keyboard
Posted: 4 November 2006 Filed under: Sound, Undergrad | Tags: sound, Undergrad 1 CommentAs per an earlier post, I’ve got an old PS/2 keyboard which I’ve just taken apart and removed the circuitboard. There’s not a lot to it as you can see below but the interesting bit is the small parallel rows of pots in the bottom right hand corner. Keyboards use a matrix with the rows and columns made up of wires. Each key acts like a switch so that when a key is pressed, a column wire makes contact with a row wire and completes a circuit. The keyboard controller detects this closed circuit and registers it as a key press. You can get a fuller explanation here. So, back to the pots. On the other side of the board is a ribbon cable connector which the matrix connects to and those pots are where the connector connects to the circuit on the board. After connecting it to my mac with the PS/2-USB adaptor and running up TextEdit I generated a key press by shortening-out 2 pots. I also ran it thru’ the hi patch we messed about with the other week and got some figures from it as well. I’ve just bought a tilt switch which, once my soldering iron is recharged (this sounds a bit bloody familar), I’m gonna stick on the end of a coupla wires and have a muck about with.
Sound applet idea
Posted: 31 October 2006 Filed under: Sound, Undergrad | Tags: sound, Undergrad 1 CommentYears ago when she was younger, my daughter had a rainmaker similar to the picture below. Inside the tube were hundreds of little bits which when you shook the tube or turned it upside-down made a noise. I think the toy itself is based on the instrument that was used by the native American indian to try and make it rain during droughts – not that I think mine will have any impact on climatic conditions unless I can find a MAX object I can hack that is. So, that’s what I wanna make and I guess I’ll need a tube, some tilt sensors and loads of wire. I’ve got an old PS/2 keyboard and a PS2-usb converter so getting it connected up to the computer ought to be ok. I’m not sure what I wanna do for the end result. Transfering the motion to sound is probably a good place to start but maybe using it to mix video might be fun as well. Or at least I think it ought to have some sort of visual representation.